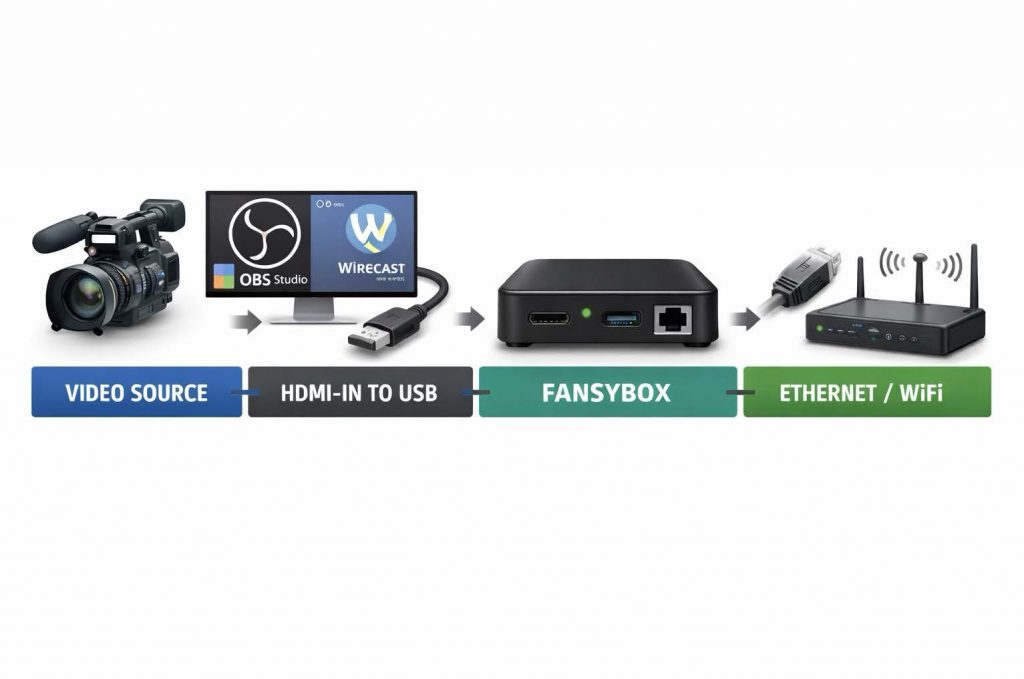
Connection Schema
Thanks to the FansyBox Admin App you can connect to your Box
Troubleshooting
Includes solutions for Network, Video, Cloud, Firmware, and Hardware issues.
Reporting Issues
Use FansyBox Admin App > Settings > Report Issue Support: support@fansy.ai
Technical Specifications
WiFi: 2.4GHz / 5GHz Ethernet: 10/100/1000 Mbps Bluetooth supported
Warranty & Safety
Limited warranty applies. Use provided accessories only.
Integration with OBS
Launch OBS and connect the live stream with the graphics you want to overlay the live action.
On the screen that shows the output as it will be streamed to the internet, right-click inside the output stream screen, as shown below:
Find the Ugreen HDMI adapter in the menu and select it for output, as shown below:
Once selected the stream will be fed to the FansyBox and utilizing the app test the video feed by gesturing to capture a clip.
Integration with Wirecast
Launch Wirecast and connect the live stream with the graphics you want to overlay the live action.
Then click on the output stream window in the Wirecast interface. In the menu click on Output; in the drop-down menu click on Secondary Display Line Output, as shown below
Click on Configure Displays.. In the next level menu, then a configuration window will open, as per the image below:
Select the Generic PnP Monitor with the highest resolution, click on Live Output mode, and select the audio device as the HDMI Monitor to get the audio track as well as the video stream. Selecting None for Audio Device leaves sound out of the highlight clip captured. See the image below:
Integration with Pixellot VPU
Configuring a local monitor output from a Pixellot Video Processing Unit (VPU) is a common requirement for onsite troubleshooting or for providing a live « coach’s view » in a press box. Since the VPU is essentially a high-performance workstation, you can treat it like a standard PC for physical connections, while using the VPU Manager for software configuration.
1. Physical Hardware Connection
The VPU typically features a dedicated GPU or motherboard ports (HDMI or DisplayPort) on the rear panel.
● Locate the Ports: On the back of the VPU tower, look for the horizontal row of ports (usually the GPU). If your monitor uses HDMI but your VPU only has DisplayPort, you will need an active DisplayPort-to-HDMI adapter.
● Connection: Connect your monitor directly to the VPU.
● Peripherals: You will also need to connect a USB mouse and keyboard to navigate the interface once the monitor is active.
2. Accessing the VPU Manager
The « output stream » you see locally is managed through the VPU Manager software interface.
1. Boot the VPU: Power on the unit. It will typically boot into a desktop environment (usually Linux-based on newer S2/S3 models or Windows on older S1 units).
2. Open the Interface: If the VPU Manager doesn’t launch automatically, open a web browser on the VPU and navigate to http://localhost or the specific IP assigned to the VPU.
3. Login: Enter your credentials (usually provided during your initial Pixellot onboarding or by your organization’s IT/Broadcasting lead).
3. Configuring the Local View
To see the actual camera feed on your local monitor:
● Head Setup Tab: Navigate to the Head Setup tab in the VPU Manager. This will put the system into « Maintenance Mode, » which pulls a direct stream from the Camera Head Unit (CHU) to your local screen.
● Panoramic vs. Produced: * The Head Setup tab usually shows the individual camera pods and the stitched panoramic view. ○ To view the « Produced » stream (the AI-tracked version that follows the ball), look for the Dashboard or Live Event section. If a game is currently scheduled and live, a preview window will often be available here.
● Full-Screen Monitoring: Most browsers allow you to « Full Screen » the video player by clicking the expansion icon in the bottom-right corner of the video window. This effectively turns your local monitor into a dedicated broadcast monitor.
4. Viewing the « Program » Feed (with Graphics)
If you want to see the final broadcast exactly as viewers see it (including scoreboards and overlays):
1. Open a browser on the VPU.
2. Navigate to your streaming portal (e.g., NFHS Network or your Pixellot OTT site).
3. Log in and play the live stream.
How FansyBox Works
Smart Video Processing & Cloud Architecture
FansyBox is designed for maximum efficiency, safety, and performance:
Local Video Processing
– Internal Processing Only: FansyBox reads and processes video internally without storing or transmitting full video streams – Local Encoding: Video content is encoded locally within the device to minimize bandwidth usage – No Direct Network Interaction: The device only communicates with our secure cloud service, ensuring network safety
Bandwidth-Efficient Design
– Highlights Only: Only extracted moments and highlights are sent to the cloud – Ultra-Light Transfers: All highlights are under 5MB each – Minimal Impact: The system uses very little bandwidth and has no performance impact on your network
Secure Cloud Communication
– Cloud-Only Architecture: FansyBox communicates exclusively with our cloud service – No Direct Phone Connection: Mobile devices connect to our cloud system, not directly to the FansyBox – Performance Optimized: The separation of duties (Box ↔ Cloud ↔ Phones) ensures solid performance and reliability. We multicast a single highlight clip out of the
FansyBox to the cloud and distribute from there to all the clients requesting the same clip.
Key Benefits
🔒 Enhanced Security: No direct network exposure beyond cloud communication 📶 Bandwidth Friendly: Minimal data usage with local processing ⚡ High Performance: Lightweight system with dedicated cloud infrastructure 📱 Seamless Mobile Access: Access your content anywhere through our cloud platform
Operating System
FansyBox runs on Ubuntu Core, a secure, minimal, and transactionally-updated version of Ubuntu designed for IoT and embedded devices.
Key Security Features
– Automatic Updates: All patches, including critical security updates, are applied automatically during system boot – Transactional Updates: Updates are atomic—either they succeed completely or the system rolls back to the previous working state – Minimal Attack Surface: Ubuntu Core’s container-based architecture provides strong isolation and security – Enterprise-Grade Security: Built on Ubuntu’s proven security infrastructure with regular security patches
For any question, please contact us at: Contact@Fansy.ai